Showing posts with label Teresa Collins Stampmaker ✿. Show all posts

Wednesday, August 8, 2012

"Lifting" with stamps, a fun necklace tutorial


I am loving this months free negative download for the Teresa Collins Stampmaker! 
You Can download it {HERE}


Chevrons are so "IN" right now so I thought I would try something fun with the
one from this month's set!


To make this fun necklace you will need the following supplies:

(2) 1x3 glass slides, 1x3 necklace frame, Cranberry Alcohol ink and some old
fashioned nail polish remover.


To start you will drop a few drops of the liquid ink onto the glass and let it
dry completely... ***TIP: if you get impatient and don't let it dry it will
smear - Your welcome, I figured that out just for you!! :)


Now comes the FUN part...you must act quickly here, drop some nail polish remover drops onto your chevron stamp and stamp it onto your glass and it will "LIFT" the alcohol ink off. You WILL have to do this acouple of times to get it all off. The great thing about this is that if you accidentally smear it you can wipe it all off with the remover and start all over.


Whew, see not so bad!


Now slide the other piece of glass over the inked side and slide into your
necklace frame and you are all done! Your very own custom chevron necklace!


I hope this inspires you to try something new! Check out more fun projects from Photocentric & The Teresa Collins Stampmaker Design Team {HERE}

Tuesday, July 3, 2012

Wishing you a Happy 4th of July!

I hope you all have a great day tomorrow! Be safe and have fun!! I know I am super excited for good friends and some awesome fireworks!!


I created this card using the free JUNE download for the Teresa Collins Stampmaker by Photocentric.


Tuesday, May 8, 2012

Wedding card using Teresa Collins Stampmaker

Love is in the air! There is nothing like a beautiful wedding, I have several that I will be attending in the coming summer months.


I loved this months free negative download, that included these. 

These were just perfect!

Click {HERE} to download this months free negative download. Be sure to check out other ideas using this months free download by visiting the Stampmaker Blog.


Thursday, February 16, 2012

Teresa Collins Stampmaker - FAMILY Canvas project

This was my fist time playing with canvas, other than a couple of classes I had taken from Quick Quotes a few years ago where we made scrapbook wall art. It was completely outside of my normal comfort zone but once I started I was having so much fun I couldn't decide when to STOP adding more layers of stamps!!


Supplies used:

Here are some the stamps that I used:


To start I painted the canvas in layers of the pink and white. Then added some ink to give some depth. After I created the stamps I started layering them using the different colors of red and pinks. I added some gems in the centers of some of the stamped images. I created a ruffled flower and added a jewel button in the center. Then inked a few select stamps in black for the high contrast. I loved creating this, it was so fun!!


Tuesday, February 14, 2012

Happy Valentines Day!! Card Making with the Teresa Collins Stampmaker free downlaod

I love Valentines... ok, truth: I love the chocolate that comes along with the day!

Making fun little valentines cards is pretty fun too!


The January free monthly download was full of fun little valentine stamps to create with and is what I used to create the card. Click on the above link for the free pdf monthly download or go directly to the TC Stampmaker website to obtain your free copy.


First you will want to create all of your stamps as I did below:


Then you will want to create all of your layers:


  • The white base stamped with "I love you" border measures 5 3/4 x 5 3/4
  • I then cut a paper bag 4 3/4 x 4 3/4 using a wavy blade trimmer stamped the hearts and the large I {heart} U in the upper left and centered it onto the white base. 
  • I cut a 1 1/2 strip of burlap and create a folded banner and glued a 4 inch scallop circle from the new Teresa Collins Spring Fling collection paper: houndstooth
  • I stamped the tag "will you be my valentine?" onto a book page and trimmed edges, added ribbon and some bling to the top of the tag.
  • I cut a 2 1/4 inch scallop circle from the TC Spring fling line paper: mixed brocade (side B - dots) then stamped the outlined stiched heart onto it adhearing using 3D foam squares. 
  • I stamped the "xoxo" strip onto white and folded around one of Teresa Collins "Ali's Pins" and adhered behind the heart. 
  • I created little tags from cream craft paper and stamped "QT" & "Kisses", I stapled "QT" with some white ribbon, layered on top of the bottom of the scallop heart. I slid "Kisses" under the lower right of the scallop heart and added a gem.
  • Adhere your creation onto a black 6 x 6 card and your done!


Tuesday, January 3, 2012

Happy New Year Card using Teresa Collins Stampmaker


Happy New Year everyone!! I am so excited for 2012 and all the good things that are happening for me and my family. I hope this year brings goodness to you and yours, Cheers!! 


I created the layers of the card then stamped 2012 as my background in a blue ink. I then stamped the Happy New Year in a darker color, the brown. I love the contrast in this card with the colors and how you can clearly see each stamp yet the do not "compete" with each other but rather COMPLIMENT one another nicely.


You can download a copy of the images to create this and many more cards {HERE}.


 I love playing with stamps like this, laying one over another and playing with color combinations. So much fun!! ~Cheri

Friday, August 12, 2011

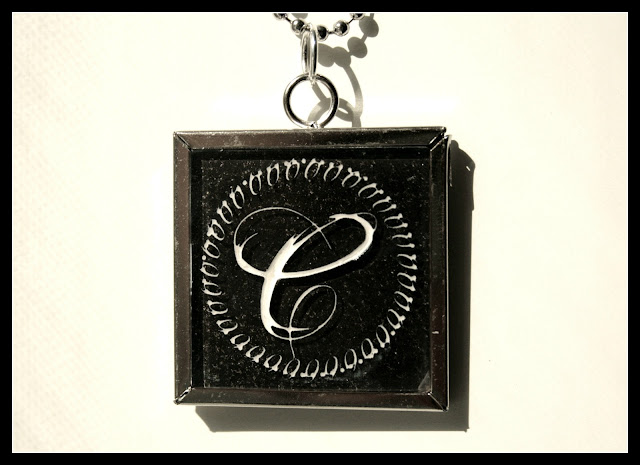
Necklace tutorial using the Teresa Collins Stampmaker

Are you ready to take your Teresa Collins Stampmaker to the next level??? Here's a little something that is a ton of fun and has HUGE impact. Once you make one, you will be making these for all of your friends - or at least be the envy of!! ✿ 


Although I would love to take credit for this idea it is not my original idea - I had seen it on a blog where they took their images and had them made but when you own your own Teresa Collins Stampmaker you can make them yourself.

Your going to create your image in the same fashion as you would for stenciling. However, if you are creating a monogram you will have to "flip" your image as I did. You will need to measure your necklace frame - both the opening of the frame and the interior width, which is what the dark square around the monogram is, I'll tell you the importance of that in a bit but the black part of the square is the difference in the opening and the interior part of the frame. This also gives you the dimension of your image or monogram in my case.

When you "cook" your image, instead of cooking it for the three minutes you are accustomed to when you create a stamp you are only going to cook it for two minutes - otherwise your image will not be recessed enough, trust me this took me a minute (or a few image pacs) to figure out...

Trim your edges away just as you normally do. You can tell you have a great image when you peel away that top piece and can see the image real clearly.

Wash your image just like normal.

Set your image just like you do for a stamp, for the full two minutes.

Next, you want to trim around the outer part of your square - this will create a "LIP" for your stamp to sit perfectly into the necklace frame. So only trim the outer, NOT the inner part of that square.

You can paint the back any color you want, I was experimenting and added some GENTRY's GLITTER into my paint.

Next you want to paint over your image and wipe away, you will end up doing this in a few layers... This does take time, I found using damp q-tips helps clean it up as you go. I also found that chocolate helps during this process. It takes practice and a little patience but the results are worth all the effort and by the time you do your third one you'll be a pro at it. I had a little extra time and added some glue and then a layer of Gentry's glitter to this one - I'm totally loving it!!

Next you will want to seal your creation with clear sealer - I think I picked it up at the hardware store for just a few bucks. OK, you should just know this as well, when your experimenting you should let everything dry completely before adding your sealer - some of the glitter went flying when I sprayed the sealer... I still love it so it's all good.

Once dry go ahead and put them in your frame. In real life you can see those flecks really do sparkle...


More Inspiration ✿

Related Posts Plugin for WordPress, Blogger...