Showing posts with label TC Stampmaker ✿. Show all posts

Tuesday, September 18, 2012

Halloween is just around the corner and I've got some great ideas using the Teresa Collins Stampmaker

Have I ever told you how much I love Halloween? I do, it's one of my most favorite holidays!


To create this card I punched three circles in the center of the card front (chevron paper) then added the small black dots paper behind the punched circles. Then I inked around the edges using an orange ink. Then layered them onto the card front. I then stamped the Halloween images onto white cardstock and inked the edges in purple and adhered them using pop dots. Then to finish the card I added some metallic orange ribbon with a bow tied around the card.

When the calendar came around to see if I was interested in creating stamps for the Teresa Collins Stampmaker I was so excited to see that October was available. I jumped all over that!!


These are the stamps I created for this months' FREE download. I love them! To download this months' images click {HERE}. Be sure to check out the Design team blog for other great ideas on how to use the stamps!


Thursday, May 10, 2012

Elisha's Senior mini album using Teresa Collins Fabrications and Teresa Collins Stampmaker


I get it now, SENIOR YEAR. I was not prepared for it, for all of the emotions. I understand now what my friends have been going through before me. Hectic but GOOD all at the same time. 

It has flown by so fast!! Listen to your friends and family when they tell you that, it's so true! I still remember the very first day of school and E in her "Mary Janes" and a dress, pretty much the only dress she wore up until this year! I have snapped so many photo's this year!


This album will be one of my very most treasured albums, so many fun memories!  I cut one of the 10x10 chipboard albums in half and used it as the front and back cover. The entire album measures 
5 x 10. Each page that I used was cut 10 x 10 and folded in half to create "pocket" pages for additional photo's! Those would be the pages with ribbon or tabs on the edges to be able to pull the extra photo's out.


When creating the album I wanted tons of layers on everything. I layered buttons on top of buttons and rhinestone gems on top of buttons and embellishments. 


I created "TOKENS" using the Teresa Collins STAMPMAKER. I love how they help finish off the senior theme of the album. Please check out the Stampmaker blog today for instructions on how to create your own! 


Supplies - 
FABRICATIONS LINEN: Papers - Green Brocade side B, Green Fleur De Lis side B, Ornate Brackets, Pretty Flowers & side B, Red Brocade side B, Red Flowers side B, Red Quatrefoil side B, Tan Damask. Embellishments from the collection: Stickers, Stamps, Die Cut Sheet, Chipboard Elements, Chipboard Album Covers, Rhinestones, Decorative Brads, Flower, Buttons, Trinkets.
FABRICATIONS CANVAS: Trinkets (large silver photo corners).
Other: Crepe paper, Teresa Collins Stampmaker, cream ribbons and cream beads, black and cream cardstock. Black photo corners. 

Wow! Senior Year!! WOO HOO!!


Wednesday, March 14, 2012

Loving the Teresa Collins "Spring Fling" collection & March Newsletter for The Hens Den

As you know by now, I am loving this new line - SPRING FLING.

I love all of the patterns in this paper and dimensions.


Instructions:
Working from left to right:


  • Cut a 3.5 strip from the small flowers and laying it over the left side of the Paisley paper.
  • I added a 1/4 strip of white next to the large strip.
  • Add the red dots scallop border sticker.
  • Mat your photo, I double matted mine using white and red.
  • Punch out Sweet moments, the green tag w/red flower from die cut card set and mat on white card stock and add bling to center of red flower on green tag.
  • Punch out three flowers, butterfly and "Bloom" from the die cut card set add bling to the center of the flowers on the bloom tag.
  • Layer your *flowers in the lowers left of photo and add bling to their centers, add the *"Sweet Moments" tag.
  • Cut the pink and red strip 4 inches and mat onto white card stock.
  • Layer your tag and stripped strip to upper right. 
  • Overlap the *"Bloom" tag and *Butterfly.
  • Slide the "girl" circle from sticker sheet just under the top left of photo.


*Use Therm O Web 3D foam squares on the large flower, "Sweet Moments", "Bloom" and Butterfly.


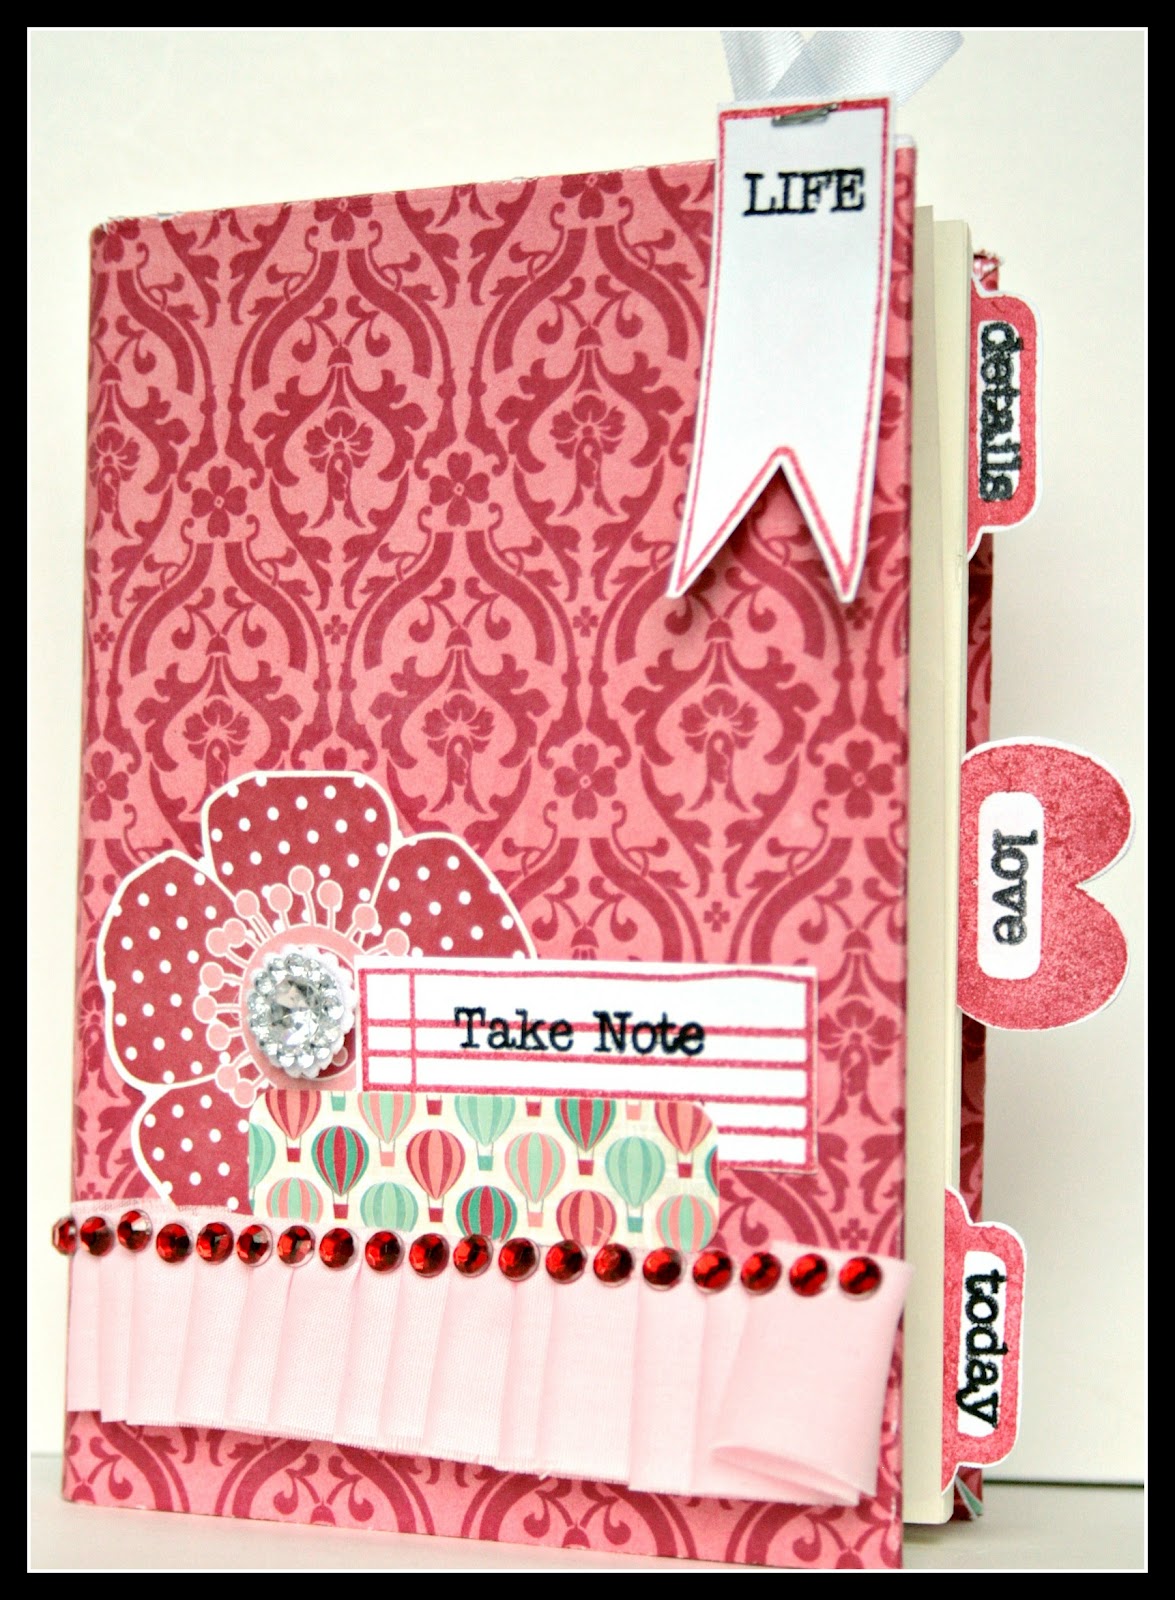
Spring Fling Journal Book!

I had a little journal book and gave it a book cover wrap. Then added a few of the die card embellishments and die card stickers.

As I was creating this little journal book I decided I needed some tabs. Then I decided that I would really like to have words that fit perfectly into the white space for the tabs.... Then of course because my juices were flowing I needed a cute little banner to use with my new words and a new journal spot... 


One of the things I love most about having my own stamp machine is that I can create a set of stamps in just moments. Stamps that I want or need for a particular project all at hand at a moments notice.

 
I love how I was able to dress up my new little journal! 

Hope you enjoy!


The March Newsletter is up for The Hens Den! So excited, full of some great inspiration!


Thursday, November 24, 2011

Happy Thanksgiving!!


Well so far today my family is thankful that we still have power!! Danny has made sure the generator is ready to go!! Yesterday my morning did not start out as planned and my whole day went a bit sideways and I felt a bit frantic trying to keep everything together. Elisha helped me so much when I got home to help prepare for today's meal, I LOVE that girl so much!! Today is going to be even more special because of all of her efforts. I truly GIVE THANKS to my girl, I am so blessed by her!!

I can't wait for Danny's family to arrive, it smells so good in our home!! On the menu - Turkey, oh my Turkey - tried a new brine from the Pioneer Woman praying I did not mess it up and that it turns out. Ham, Sausage stuffing, soul sweet taters (E is beside her self for these!), broccoli salad, cheesy cauliflower, all the typical sides, oh yes and creamy mashed potatoes...I'm so hungry can you tell??

I made the above "GIVE THANKS" using this months free negative download for the Teresa Collins Stampmaker, I love these monthly downloads!!

From our family to yours Have a very Happy Thanksgiving!! ~C

Wednesday, September 7, 2011

Come join me for a GRAND OPENING!!

Sharin Memories 
Grand Opening 
Saturday 
September 10th!!

4460 Pacific Ave. SE Lacey Wa. 98503


I will be there from 10am to noon...
DEMONSTRATING (insert drum roll)

The Teresa Collins Stampmaker!! 

We will be making cute little charms! You will get to create stamps "hands on".
You will be "wowed" with the magic of creating your own stamps and much much more with this machine and all that it can do!

Please come join me and check out the new store chalked full of the latest and greatest!!
I hope to see you there!!  ~Cheri


MAP:

Friday, August 12, 2011

Necklace tutorial using the Teresa Collins Stampmaker

Are you ready to take your Teresa Collins Stampmaker to the next level??? Here's a little something that is a ton of fun and has HUGE impact. Once you make one, you will be making these for all of your friends - or at least be the envy of!! ✿ 


Although I would love to take credit for this idea it is not my original idea - I had seen it on a blog where they took their images and had them made but when you own your own Teresa Collins Stampmaker you can make them yourself.

Your going to create your image in the same fashion as you would for stenciling. However, if you are creating a monogram you will have to "flip" your image as I did. You will need to measure your necklace frame - both the opening of the frame and the interior width, which is what the dark square around the monogram is, I'll tell you the importance of that in a bit but the black part of the square is the difference in the opening and the interior part of the frame. This also gives you the dimension of your image or monogram in my case.

When you "cook" your image, instead of cooking it for the three minutes you are accustomed to when you create a stamp you are only going to cook it for two minutes - otherwise your image will not be recessed enough, trust me this took me a minute (or a few image pacs) to figure out...

Trim your edges away just as you normally do. You can tell you have a great image when you peel away that top piece and can see the image real clearly.

Wash your image just like normal.

Set your image just like you do for a stamp, for the full two minutes.

Next, you want to trim around the outer part of your square - this will create a "LIP" for your stamp to sit perfectly into the necklace frame. So only trim the outer, NOT the inner part of that square.

You can paint the back any color you want, I was experimenting and added some GENTRY's GLITTER into my paint.

Next you want to paint over your image and wipe away, you will end up doing this in a few layers... This does take time, I found using damp q-tips helps clean it up as you go. I also found that chocolate helps during this process. It takes practice and a little patience but the results are worth all the effort and by the time you do your third one you'll be a pro at it. I had a little extra time and added some glue and then a layer of Gentry's glitter to this one - I'm totally loving it!!

Next you will want to seal your creation with clear sealer - I think I picked it up at the hardware store for just a few bucks. OK, you should just know this as well, when your experimenting you should let everything dry completely before adding your sealer - some of the glitter went flying when I sprayed the sealer... I still love it so it's all good.

Once dry go ahead and put them in your frame. In real life you can see those flecks really do sparkle...


Friday, July 29, 2011

Teresa Collins Stampmaker - my projects used for HSN/CHAs 2011

I'm so very excited to finally get to share with you all the projects I had made with the Stampmaker for Teresa's HSN event and CHA 2011s.

This is just a little charm bracelet, The background image is also stamped.

 Here are the same stamps used to create this necklace.


Did you know you could also emboss with the machine? I used the same image to create two different results, this one is the embossed:


And here is the same image used but made into a stamp rather than an embossing plate to make this necklace and another card.


I love this one, did you know you can make a photo or drawing into a stamp? I love this, think about the possibilities - baby's feet, your child's hand writting or drawing...the possibilities are so endless with this machine! The yellow background is also a stamp that comes with the machine and I use it all of the time.


ahhh, last but not least - my new addiction - I love making these necklaces... It's not my original idea and I will share a tutorial with you soon on how you can make these too, it will blow your mind and take your machine to a. whole. new. level.


Have an awesome weekend!! Cheri

Monday, May 23, 2011

Card inspiration using Core'dinations, POSH and TC Stampmaker

I am loving the coordinating card stock by Teresa Collins called Core Amour by Core'dinations! It is embossed paper that you can sand to reveal other colors. This one reveals the color pink when sanded. So cool!


“Core’dinations Posh - Thank you card”
Designed by: Cheri Piles 
Featuring: Teresa Collins Designs – POSH and Blingage 

Supplies:
Core’dinations. Posh: Die Cut Card Set, Trims, Elements, Brads
Thank you stamps created with Teresa Collins Stampmaker

Instructions:

Preparing your page components:

1. Punch out the following from the die cut card set paper: pink tab, pink mini damask tag, large grey and white tag, grey and black tag.
2. Punch out pink butterfly from chipboard elements
3. Cut one rosette from black flower trim
4. Create your thank you and thanks stamps with TC Stampmaker

Assembling your page: 

  • Fold paper in half and sand paper revealing pink damask pattern.
  • Stamp Thanks along top of pink tab and fold in half.
  • Fold large grey tag in half and adhere pink tab to top left.
  • Stamp thank you to tight of grey and black floral tag
  • layer grey and black thank you onto pink tag on an angle
  • Punch hole in upper right corner of pink tag and add grey and black damask brad.
  • Adhere Thank you/pink tags to right side of large grey tag that you folded in half earlier.
  • Adhere your thank you layers to upper left of card on an angle
  • adhere black flower to your layers on lower left.
  • adhere your pink polka dot chipboard butterfly on middle left side of card in opposite direction of butterfly in lower right corner.
  • Punch hole in card just left of tower and add large black brad.
  • Add a dot of black diamond stickels every ¼ inch around top, right and bottom of card.
I love a quick and easy thank you card! 

Enjoy your Monday! ~Cheri

Tuesday, May 10, 2011

Making your own stamps...

Making your own home made stamps sure has come a long ways!

I was looking thru some old school projects my mom had saved and put away in a box for me when I came across my first stamp. It appears I was in the 2nd grade when I made it, I can't believe they let us use sharp tools back then but apparently they did!

I have no idea what the material originally was, it's pretty hard and it has almost a burlap type of backing. You can see that we drew our image right onto it and scraped it out with some sort of a tool. It still has some of the silver paint or ink up at the top! I guess you never grow out of some things, I love silver ink!


If you look on the right sidebar you will notice a new badge, I'm on another design team...
Of course, it's the Teresa Collins Stamp Maker!
Teresa Collins Stampmaker
Teresa Collins stampmaker

I have to tell you, making stamps REALLY has come a long ways! When I first got my machine I was a little overwhelmed with all of the possibilities!! It's like magic every time and it only takes a few minutes to make it!

I use photo shop when I create my negatives or I use the monthly free downloadable images. So easy!! Be sure to check out the Stampmaker Design Team blog for loads of inspiration!

Wednesday, July 28, 2010

CHA happiness and a few fav's I've seen so far

I love CHA which is the Craft and Hobby Association


Someday I hope to attend just to take it all in. It overwhelms my mind just to see all of the fun over the internet. Ahhh... Someday. There are so many talented companies, and products Oh my!


BIG EXCITING NEWS!!!
Teresa Collins Stamp Maker WON for:  
Innovations Runner Up - Photocentric for the Stamp Maker (Booth # 1343)
Photocentric's Stamp Maker
This is a great big huge deal, there are so many products and companies just to be nominated is an honor. I'm soooo beyond excited and proud of her!

Runner Up


Last summer was the first one I "tuned" into on the net and last winter I was hooked into watching on Facebook or company blogs (thank you google reader & Twitter) 


Another good tip: follow AMY COON with THE PAPER LIFE! She is there right now interviewing various companies and capturing it on video. She interviewed Making Memories yesterday and we got to see all their new lines! I ADORE Amy, her blog is beyond awesome, tons of great ideas and inspiration all of the time!


Another great source for all of the new scrapbooking product releases: The Scrap Review.


Besides Loving all things Teresa Collins...


BL1912 Paisley's Flower


I have other fav's and I thought I'd share a few with you today, Warning it's a long post today! Hope you enjoy!!!


Graphic 45's booth last winter just blew me away! I couldn't wait to see what it would look like this time... I'm just starting to spy pictures, from the different companies. The Craft Critique had some good ones this morning, to see more go to their blog.


Ok, LOVE the hat! How awesome!! Serious inspiration happening here!


I am beyond smitten with this line from Crate Paper, it's called Restoration:

Chipboard 3
6 x 6 pad

Heading 2
  
Kit 
I just may be the last person in the universe to not own a Sizzix machine, or any other machine you could run the Tim Holtz Alterations thru... But IF I did....
656938_Tag_Bookplates_PAC

Decstrips

Speaking of machines... This little gem is so neat looking!
TH_vagabond_stickered
And how about this? Configurations - On my coolness ranking I'd give it a big fat 10! 
54
Ok, so Tim and Ranger (love those distress stickles!!! Although I should probably have all the new inks from the winter show release to accompany them, lol!) So many new items, lets just go on record and say, yes, I love it all! 
Ok, One More then I'll quit...This is NOT to say I don't have more fav's, but how long can a blog post be before you all loose some serious interest??? 
Love the flower darlings, ruffled darlings, TICKETS and how cute are those Anthology Notes? Seriously adorable collection. So, YES, I'm aware the right side of the picture is cutting off, sorry! It's either a little cut off or so small you can't see it, However if you click on the Pink Paislee link above you'll be able to see the WHOLE Picture. :)  

Have a great day! ~Cheri

PS, What are your favorites so far? Leave me a comment and let me know what you've seen out there that you have your eyes on. :)

More Inspiration ✿

Related Posts Plugin for WordPress, Blogger...